PxdScript language tutorial series.
Chapter 11 - The Virtual Machine:
by Kasper Fauerby
Introduction
Hi again and welcome to chapter 11 - the last chapter in the PxdScript tutorial series.
Today we'll build a so-called virtual machine (from now on referred to as a VM) that
can read one of the compiled binary script files that our assembler (from last chapter)
has emitted and execute it within our game engine. Now, the topic of VMs is a huge
one and I guess I could write an entire tutorial series on this subject alone if we
were to create a really advanced VM with garbage collection, JIT compilation etc.
Luckily PxdScript is still a pretty simple language (it's not object oriented for
one thing) so it turns out that we don't really need all those fancy features in a
VM for PxdScript. So the VM we're going to create today will be a pretty simple one
but never fear - it'll probably be powerful enough for most of you as long as you
doesn't turn PxdScript into an object oriented language or adds stuff like dynamic
allocation of memory for arrays or something along those lines :) Well, enough with
the introduction - let's get to work!
You can find a link to the source code for this chapter at the PxdScript tutorial
webpage.
The demo application and script examples
Now, because I know that many of you will download and try out the sample code before
actually reading the text (ok, I know - it's my own fault.. I could have placed the
download link at the end of the tutorial instead of having that tempting link just
a few lines above) I'll comment a bit on it already here at the beginning of the chapter
where there is still at least a chance that people will read it before trying
out the demo :)
Inside the package you'll find a bunch of c++ source files. After you've compiled
the sources (just type make in a linux or cygwin shell.. or set up a small
project in VC or whatever other compiler you use) you should have a executable called vm.exe.
This program takes as argument a compiled script file and I've provided you with 3
small examples in the package - they can be found in the examples subdir and
are those files with the .cde extension. The .prg files (also in the examples directory)
contains the PxdScript source for the examples.
When the time came where I had to actually write up the demo and the small example
scripts I began to realize that I had probably made a mistake when I designed the
language by not including more ways of interfacing with the world outside the script.
As I've talked about a few times before in the previous chapters I only included a
single means of interacting with the underlying game engine - namely the setint language
construct - so I was limited to set integer values in some engine objects
in the demos - I couldn't read anything back etc. I should probably also have added
some more traditional means of outputting information (for example a string of text)
to the screen etc.. but done is done and now I guess we're stuck with the setint :)
As a result the example scripts doesn't really make much sense in what they do - instead
I've designed them in a way such that they get around just about all of the opcodes
in the language! This means that all parts of the VM should be tested for correctness
by those three samples :) I just hope that you can still see that the VM and ScriptManager
system does indeed work and that you'll be able to easily see
how you can extend it to meet your needs.
Anyway, in the demo application I've implemented a 'dummy' player class
with a few integers that can be set from the script - hp and score. So
those are accessed through the setint language construct with type set to TYPE_PLY and
integer numbers 0 and 1. Then I've cheated a bit and used that a string (a name) is
actually passed with each setint call in PxdScript. This means that I can 'hack' string
output by setting some unused integer number (for example nr 2 in the player class)
to something but in the handler code for that setint call I just output the string
passed as name rather than actually setting an integer value. It's an ugly hack, but
it gave me text output in the demo :) Look in Player.cpp in the setInt function
and in the example script files to see how this hack is being done :)
To further limit the demo application I've chosen not to include any kinds of trigger
events (remember those from chapter 1? Those different events that could trigger scripts?)
so all the programs in the examples are 'trigger_on_init' which means that they'll
start to run as soon as they've been loaded. When there are no longer any running
scripts (all has finished execution) the demo program will end. It should be quite
easy however to see how to extend the ScriptManager to be able to trigger programs
on other types of events (on collision with something etc).
Ok, so let me briefly list what the three programs demonstrates:
-
helloWorld.cde: This is the most simple script file you can imagine. It contains
a single program that just prints a single line of text and then exits.
-
testTypes.cde: This file contains two programs that'll run in parallel (as
if in two threads.. more on this later). Both programs doesn't really do anything
useful but they does some calculations on the integer and bool data types to test
all those opcodes involved with integers. Things tested includes: recursive function
calls, integer return values, integer arithmetic, sleep, boolean arithmetic, while
loops and for-loops. One program just messes around with integers forever
in a while(true) loop and the other list the Fibonacci numbers from 10 down to 0.
They run in parallel and out of sync (different sleep times) so their output is interleaved
in one big mess on the screen.
-
recursiveBeer.cde: This one does operations on strings and uses recursion to
print the classic 'Beers on the wall' song. Things tested includes recursive calls,
string manipulation, conditional branching (if-then-else) and casts from int
to string.
Our goals for the ScriptManager system
Ok, before we move on to look at the VM itself I'll talk a bit about how we actually
wants to handle the script programs we load from the script file. As each script file
contains many programs and many functions (opposed to one program and
many functions like a normal C-program) it seems like we're going to need some sort
of threading concept to be able to run more than one script program at a time. What
we'll do is to still just use one thread in our C++ game engine and
then emulate a multithreaded environment for the scripts. Each game frame the game
engine will call a ScriptManager and allow all script to execute a bit
of their code in turn. The ScriptManager will simply keep a list of currently running
programs and each game frame it'll pass each of these in turn to a VM which will execute
a bit further in that program. It will continue to execute code until either the program
puts itself to sleep or until that program has executed a maximum number of opcodes
for this frame. This last setting is simply something we set in the ScriptManager
so each program is allows, for example, a maximum of 128 instructions per game frame.
This is to avoid the game engine being stuck in an endless script loop where the script
writer has forgotten to insert a sleep command.
Also, for some script programs it makes sense to be able to run it for two different
events at the same time (for example a script fading out a light source. Such a script
might be made to run for each light that needs fading at a certain time) so we'll
think of the programs in the script file as program templates (or even classes if
you like) and each running script program is an instance of one of the
program templates. So what we load in from the script file are program templates and
to actually make a script program run we'll instantiate it to a program
instance. The ScriptManager keeps two lists:
It is the second list that is run through each game frame and it is program instances
that we feed to our VM.
Program templates and program instances
Ok, I think it's time we start looking at some code now so lets first define some
of the data types we need for our VM & ScriptManager.
Actually we already know what the structures for the program templates looks like
- because it's the same ones that we used in the assembler where we wrote the script
file. Looking in the file pxdScriptHeaders.h from the compiler project we find
the following struct:
typedef struct PROGRAMHEADER {
char *name;
unsigned char localLimit;
unsigned short int stackLimit;
unsigned char triggertype; /* Numbered as in the enum in TRIGGER */
char *triggerArgument;
unsigned int startCode;
unsigned int endCode;
} PROGRAMHEADER;
This struct contains the information we need to be able to instantiate a running program.
The most important fields are the startCode and endCode ones
because they define where in the code segment we can find the actual byte code for
this program. A program instance will start executing byte code at startCode and
the program will run until it reached endCode. When that happens the
program has died and can be removed from the list of running programs.
Ok, remember that PxdScript is a stack based language? While all program
instances and functions shares a common code segment (that was how we chose to store
the byte code in the assembler, remember?) each program instance needs its own execution
stack where it can perform calculations local to exactly that instance of the
program template. The stack needs to be able to contain all the supported data types
- in our case integer and string (bool is considered an int). Now, the solution I
present here is easy to understand but it wastes a little memory. Not so much that
I think it matters but in principle the following approach is pretty wasteful. The
struct we'll use for a stack element in this VM looks like this:
class StackItem {
public:
int intval;
string strval;
};
Of course the waste I'm talking about above comes from the fact that each stack item
is as large as the total size of all the data types. However it's not possible to
put the above into a union because string is an object. If I had used a char* as
a string it could have been within a union and each stack item would have been 4 bytes
big. But then I would have to tell you about garbage collection etc. We get so many
nice things from the std::string that I've chosen to use it here for
ease of understanding. Once you've fully understood what's going on in the example
code you can make it your first exercise to change this into something smaller and
hopefully better :)
Ok, now it's time to take a look at the class we'll use for a program instance. I've
cut away the functions on it so you'll only see its member variables below. But check
out the whole class in ScriptTypes.h and ScriptTypes.cpp.
class Activation {
public:
int endCode;
int pc, bsp, sp;
int numParams;
};
class ProgramInstance {
private:
// current activation
int a;
// Stacks:
StackItem *stack;
Activation *activationStack;
public:
// The template for this program instance
PROGRAMHEADER *programTemplate;
// State:
bool sleeping;
bool dead;
unsigned long wakeuptime;
};
So a program instance has a pointer to its template (or class), it has an execution
stack (just called stack in the above), it has some status variables that tells
us whether or not the program is sleeping (and if it is, when should we wake it up
again?) and if it's dead. Finally it has something that I haven't talked about yet
- an activation stack.
An activation
The concept of an activation is so important that it deserves its own section.
If you look inside the Activation class above you'll probably recognize many of the
variable names back from chapter 7 when I talked about VMs for the first time. It
seems to hold the endcode (which we know also is stored in the program template so
why also put it here? That'll become clear in a second) and then it seems to be responsible
for those pointers I talked about back in chapter 7 - the program counter (PC) that
keeps track of where in the code we currently are, the base stack pointer (BSP) that
points to the bottom of the stack so we can find the local variables, the stack
pointer (SP) that points to the current top of the stack so we can get the top
most stack value (needed in many opcodes) or push a new value onto the stack. Finally
it has a member called numParams that holds how many parameters this activation
has.
So the activation structure defines the frame or context that the program
is currently executing within. When a program is instantiated it gets an initial activation
pushed onto its activation stack with values copied from its program template and
the PC set to the start code. If the program just runs through the body of its code
without making any function calls then that'll be the only activation it'll ever have
on its stack. But what happens when a function is called? Well, one could say that
while the function is being called the program is in a new frame or context -
namely that of the function. The function header also has a startCode and endCode
and while executing the function the PC will point to a totally different area of
the code segment than it pointed to just before the function call. But after the function
has finished executing we need to restore the state of the VM to where it was before
the call so that it can continue execution at the byte code immediately after the call byte
code. The stack must also be restored to where it was before - with the single exception
of a possible return value from the function being placed on the top of the stack
after the call.
So when a function is called a new activation is created with a new PC, a new endCode
and a new SP. There is also a new BSP that points to the place in the execution stack
where the first argument to the function is stored. This is because in the functions
activation, that stack item has become a formal variable (one of its parameters) in
the context of the function code. And when the function needs the value of that parameter
it'll look it up, just like the program would, by an index from its BSP. The SP is
also changed from the previous activation to make room for any local variables that
the function might use. These will also be stored on the stack and accessed through
some index from the BSP.
This is pretty hard to understand, I know, but take a look at this drawing:
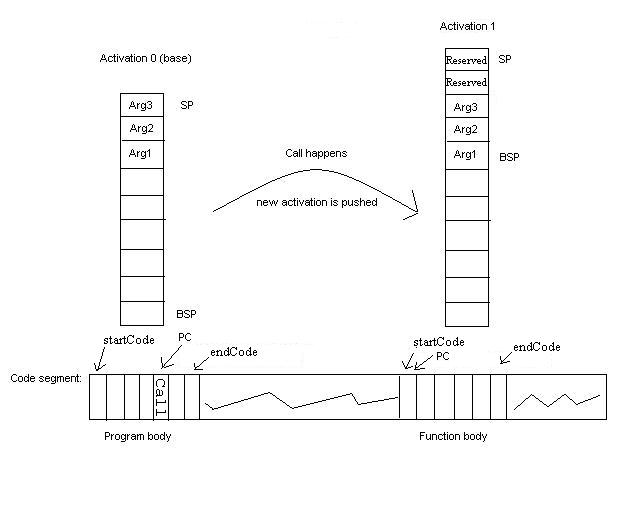 The picture shows
how we at a function call pushes a new activation on the activation stack with a new
BSP, a new PC, a new startCode and endCode and a new SP that reserves room for 2 local
variables to be stored on the stack (they will be placed just after the formals).
When the function returns (when the PC in activation 1 reached the functions endCode)
the activation is popped of the activation stack and we continue execution
of the program at the byte code immediately after the call byte code
in activation 0 - with the BSP and SP restored to their previous values. The reason
why we need to save in the activation structure how many parameters (or arguments
- so 3 in the example showed in the picture) an activation has is because after the
function has returned we expect the arguments to be popped off the stack so that the
SP in activation 0 actually isn't restored to its previous value - it is restored
to its previous value minus the number of arguments, right!?! So where on the picture
should SP in activation 0 be after the function call?. Finally, if the function
has any return value (this can be seen directly from the return opcode which is one
of return (no return values), ireturn (an integer return value) or areturn (a
string return value)) then that return value is pushed onto the stack and the SP adjusted
accordingly.
The picture shows
how we at a function call pushes a new activation on the activation stack with a new
BSP, a new PC, a new startCode and endCode and a new SP that reserves room for 2 local
variables to be stored on the stack (they will be placed just after the formals).
When the function returns (when the PC in activation 1 reached the functions endCode)
the activation is popped of the activation stack and we continue execution
of the program at the byte code immediately after the call byte code
in activation 0 - with the BSP and SP restored to their previous values. The reason
why we need to save in the activation structure how many parameters (or arguments
- so 3 in the example showed in the picture) an activation has is because after the
function has returned we expect the arguments to be popped off the stack so that the
SP in activation 0 actually isn't restored to its previous value - it is restored
to its previous value minus the number of arguments, right!?! So where on the picture
should SP in activation 0 be after the function call?. Finally, if the function
has any return value (this can be seen directly from the return opcode which is one
of return (no return values), ireturn (an integer return value) or areturn (a
string return value)) then that return value is pushed onto the stack and the SP adjusted
accordingly.
Notice that the size of the activation stack defines the maximum recursion depth the
VM can handle! If you allocate an activation stack of size 100 then you can only recurse
to a depth of 100 because for each call you push a new activation and by the nature
of recursion there are no returns until the very end. Of course a dynamically growing
activation stack could solve this problem easily (not implemented in the example code..
so try to figure out what the maximum recursion depth is in this VM and fix it to
be able to handle an arbitrary depth).
With this and the previous section in mind let us take a look at how we actually create
a program instance in the ScriptManager.
ProgramInstance* ScriptManager::instantiate(PROGRAMHEADER *programTemplate) {
// Create instance and let constructor initialize basic fields
ProgramInstance* instance = new ProgramInstance();
// Set the template pointer
instance->programTemplate = programTemplate;
// Initialize the activation stack:
// (all the helper functions works on the current activation - in this case
the base activation, or activation 0)
// Copy endcode, startCode and localsLimit from the program template (so here
at the base activation this
// appears to be copied information we could just as easily get from the template
pointer but now we know
// why these values can and will change to something different from those in
the template, right?)
// Notice how the SP is set to the programs 'localLimit'. This is a value telling
us how many local
// variables the program body uses and so we reserve space for these at the
bottom of the stack.
instance->setEC(programTemplate->endCode);
instance->setPC(programTemplate->startCode);
instance->setSP(programTemplate->localLimit);
// The BSP for the base activation is 0, bottom of the stack.
instance->setBSP(0);
// By convention there are no parameters to programs, only function
instance->setNumParams(0);
// return the instance.
return instance;
}
I think the above function speaks for itself now after our extensive discussion of
the activation concept etc. so just take a look at it and make sure you understand
everything so far.
The interpreter / VM
So now that I've covered how we want to handle the programs by creating program instances
etc. and now that we've discussed how to implement function calls then one big question
remains - how do we execute the actual byte codes? This is fortunately very easy and
the overall loop for the interpreter goes like this:
while( program not dead AND number of byte codes executed this frame < MAX_PER_FRAME)
{
1) Look up the next byte code from the code segment (at the PC)
2) Look up the piece of C++ code that'll emulate that byte code
3) Execute the byte code
}
Step 1 is sometimes called fetch, step 2 dispatch and
step 3 execution.
The fetch step is obviously extremely easy. One just has to fetch the
byte pointed to by the PC of the current activation in the code segment. Then the
PC is increased so it points to the next opcode in the code segment.
The dispatch can be implemented in a few different ways and the easiest
(and probably the less efficient one) is to simply have a giant switch on the fetched
byte code. This is of course the approach we chose for our example interpreter for
PxdScript (as seen in the files VM.h and VM.cpp). It doesn't matter
much for a scripting language intended for running fairly lightweight game scripts
how the dispatch is done but in a real VM, like the java virtual machine for example,
where millions of byte codes must be executed at speeds that must rival that of native
code it's one of the places where you can see the overhead of using byte codes
instead of native code. A more hacked but probably faster dispatch approach would
be to have an array of function pointers. Each array entry would then have a pointer
to the function that'll execute the byte code with the same number as the array index.
This approach would require a small function for each opcode but dispatch would be
reduced to a function call to the right opcode handler. If this topic interests you
then I suggest you do a search on the net for more information.
The execution step is special for each opcode in the language and in
our approach the code is to be found with the huge switch in VM.cpp. Rather than covering
all of the opcodes here, which would be extremely boring both for you to read and
for me to write, I suggest you look in the VM.cpp where I've commented on what's going
on. If you understand what each opcode does then understanding the execution step
should be a breeze.
There are only two things that I still need to explain about the interpreter - and
that is how we handle the constant pool and how we handle function lookup for
the calls. Remember what the constant pool is - it's a place where we store constant
values of those types or language supports. Whenever a constant is needed in the code
we've stored a zero-based index into the constant pool so that we can retrieve the
actual constant value. So we'll simply use an array of StackItem's as the constant
pool. When we load the script file there'll be a block containing all the constant
values and from this we construct the constant pool array and hand it to the VM. Remember
that while each program has its own execution stack there will only be one constant
pool for the entire script collection.
The functions are simply inserted into a hash table with their names as the key. This
hash table is also something that we can create at load time when we load all the
function templates from the script file. The hash table is then given to the VM so
that it can look up a certain function from its name (which is again stored in the
code segment as an index into the constant pool where the function name is stored
as a string). One thing that could be noticed here is that a function lookup isn't
actually necessary in a language like PxdScript that has no virtual functions. One
could enumerate all the functions in the assembler and simply store a 'function index'
into a 'function array' at each call site. This would eliminate the function lookup.
But if you extend the language with things like those external functions I talked
about in chapter 1 then you'll most likely need some sort of function lookup anyway
and this should give you an idea how it could be done. It would make a good exercise
to modify the compiler and VM to implement those function index things though.
To give an example of how opcodes are executed by pieces of C++ code I'll list the
execution code for the call / return opcodes (explanation is in the comments in the
code, so read through it)
case callC: {
// Get the index into the constant pool where the name of the function lies
as a string:
// As you remember, our assembler stored this information as a 32bit int in
the CS just
// after the opcode itself (the thing with 'plugs' remember?)
unsigned int index = *((unsigned int*)&CS[prog->getPC()]);
prog->addPC(sizeof(unsigned int));
// look up the function in the function hash-table:
FUNCTIONHEADER *theFunction = NULL;
bool found = functionList->get(constantPool[index].strval, &theFunction);
if (found && theFunction != NULL) {
// Get the current stack pointer for this activation
int curSP = prog->getSP();
// push a new activation:
prog->pushActivation();
// Set the start and end byte code for this activation
prog->setPC(theFunction->startCode);
prog->setEC(theFunction->endCode);
// Set the BSP to the first of the arguments to this new activation.
// This is equal to the current stack pointer minus the number
of expected
// arguments to the function (make sure you get this)
prog->setBSP(curSP - theFunction->inputs);
// Set the new stack pointer to BSP + LocalsLimit
// Remember, localsLimit is something we calculcated in the resource
step of the
// compilation and it tells us how many variables - params and
local variables -
// the function is going to need. These will be stored at the bottom
of the stack
// indexed from the BSP and we cannot do any calculations on this
part of the stack.
prog->setSP(curSP - theFunction->inputs + theFunction->localLimit);
// Save in activation how many input parameters the function has
// (needed to pop it correctly later)
prog->setNumParams(theFunction->inputs);
}
else {
// this should never happen.
Log("ERROR - function %s was not found in VM", constantPool[index].strval.c_str());
}
} break;
... and let's say the call above was to a function that returns an integer result.
Then we would handle the return like this:
// Return an integer value to the activation below this one.
case ireturnC: {
// Get the result. It's on the top of the stack:
int res = prog->getInt();
// Save how many parameters this activation (the function) has.
int numArgs = prog->getNumParams();
//Pop the activation:
prog->popActivation();
// Pop the arguments in the old activation:
prog->pop(numArgs);
// Push the result to the top of the stack
prog->pushInt(res);
} break;
ScriptManager revisited
OK, we're almost done now. All that remains is to take a closer look at how we do
all the practical things like reading in the binary script file, create the VM etc.
As most of this is just some trivial code I won't attempt to explain it in details
here - you would probably be better off just looking through the example code. Instead
I'll just talk a bit about the overall structure of the code.
The first thing the game engine should do is of course to load the script file into
the script manger. This is done through the load function like this:
ScriptManager::instance()->load("myScript.cde");
As you can see I've implemented the ScriptManager using the singleton pattern. If
you are not sure what that means you should look it up on the net or read the brief
explanation I've given in the player.h file (the player class also uses the
singleton pattern in this example). If you look in the load function in the
ScriptManger class you'll see how it just reads in the script file from the format
we defined in the last chapter when we created the assembler. There is absolutely
nothing exciting going on there but note how we build the constant pool and the function
hash table as explained in the previous section.
When the file has been loaded the ScriptManager constructs a VM from the constant
pool, the code segment and the function hash table. It'll also have a list over the
program templates - these are the programs that can now be triggered from outside
the ScriptManager (through those member functions that you implement). Finally
it'll run through the list of program templates and create instances of those program
templates that has a trigger_on_init trigger type. All currently running program
instances are kept in a list called runningPrograms.
Now the loading of the script is complete and the scripts are ready to be run (in
fact, in the example code they have all already been started since they all have a trigger_on_init trigger
type). Normally you'll have a main loop in your engine looking somewhat like this:
while (true) {
frameMove();
frameRender();
}
Now you'll have to extend it to also update all running scripts each frame like this:
while (true) {
frameMove();
ScriptManager::instance() ->handleScripts();
frameRender();
}
The handleScripts function will simply run through the runningPrograms list
and pass each of them to the VM's run function. In theory each script will
run until it puts itself to sleep or dies/finishes but to avoid having the engine
hang if someone forgets to put a sleep command in a while(true) loop (for example)
we'll give the VM a maximum number of opcodes it is allowed to execute each frame
per program. In the example this limit is set at 128 instructions per program per
frame.
Ok, that's all I'm going to say about the example code. If you've read the entire
text and have understood everything so far then I think you should be able to work
your way through the code to get a clear understanding of how things works - so you're
on your own now :)
Checklist
Final words
Well, it's almost hard to believe but I guess it's time for my last final words (in
this tutorial series at least). If you've followed me this far then I'm sure you've
found out yourself that creating a script language can be loads of fun as well as
a very challenging task. And after this chapter you should even be able to use the
information in your own game engine to add the very powerful tool of scripting to
it. Another extremely valuable thing you might have learned from this series is a
better understanding of what is going on, not just in the PxdScript compiler but actually
in any compiler - also gcc or VC or whatever compiler you're using for your
game engine. It is no longer a mystery how it can take that source code you write
and spit out an executable. Also some of the errors and warning that it spits out
now and then will probably make sense to you in a much deeper way now.
I know some of the chapters has been very delayed and I apologize for that. I know
some of you have put a lot of effort into learning all this stuff and it has been
frustrating to be stuck at a certain point because the next chapter wasn't available
yet. Still, the writing of this series has also been a great task and it was something
that I had to fit in between loads of other tasks that I had to take care of - some
with an admittedly higher priority than this series :) But thanks for staying with
me all the way to those who're reading this :)
At one point I had two more chapters on the chapters list above - one about pre-processing
and one about optimization of the byte code. Those chapters will unfortunately not
be written! It is possible that I'll release some shorter notes on those topics that'll
at least guide you in the right direction if you chose to tackle these things on your
own and for those of you that's just dying to improve the compiler with these things
here's the idea in two sentences. For pre-processing look at the cpp tool that
comes with cygwin, Linux or the GNU compiler package. Maybe you can use this to pre-process
the code and just modify the compiler to be able to parse the output of cpp. For optimization,
look up peephole optimization and figure out how to apply this as a step just
after the code generation module in the compiler. Generally you should optimize for
size because in the case of an interpreted language executing fewer opcodes usually
also means faster execution (so in this rare case optimization for speed and size
actually go hand in hand :)
As always...
Keep on codin'
Kasper Fauerby
www.peroxide.dk